
Home / Examples / Electromagnetic Analysis [Hertz] / Example 28: Coil-to-Coil Power Transfer
The self inductances and the mutual inductance are solved for two coils.
Current flowing through the coil and electromotive force at the secondary coil are calculated.
Unless specified in the list below, the default conditions will be applied.
Results will vary depending on Femtet version and the PC environment.
Item |
Settings |
Analysis Space |
3D |
Model Unit |
mm |
Item |
Settings |
Solver |
Electromagnetic Analysis [Hertz] |
Analysis Type |
Harmonic Analysis |
Harmonic Analysis tab and Open Boundary tab are set as follows.
Tab |
Setting Item |
Settings |
Mesh |
Frequency-Dependent Meshing |
Reference Frequency: 1×10⁶ [Hz] Select [The conductor bodies thicker than the skin depth constitute the boundary condition]. |
Harmonic Analysis |
Sweep Type |
Select Single Frequency |
Sweep |
Frequency: 1×10⁶ [Hz] |
|
Sweep Setting |
Select Discrete Sweep |
|
Input |
1.0 [W] |
|
Open Boundary |
Type |
Absorbing Boundary |
Order of Absorbing Boundary |
1st-order |
Two coils (Coil1 and Coil2) are placed in a cubic ambient air.
Both ends of each coil are connected by the sheet bodies where ports are set.
The ports of Coil1 and Coil2 are Port1 and Port2, respectively, and the integral paths are set.

As explained in Example 33: Coil-to-Coil Power Transfer, in the magnetic harmonic analysis,
ports of the coils need to be extended to the electric wall. In the electromagnetic analysis, however, it is not required.
As in this example, the ports can be added to connect the ends of coils in the analysis domain.
Body Number/Type |
Body Attribute Name |
Material Name |
0/Solid |
Air |
000_Air(*) |
1/Solid |
Coil1 |
008_Cu (*) |
2/Solid |
Coil2 |
008_Cu (*) |
(*) Available from the material DB
Boundary Condition Name/Topology |
Tab |
Boundary Condition Type |
Settings |
Port1/Face |
Electric |
Port |
Reference Impedance: Select Specify and enter 50 [Ω] Number of Modes Number of Precalculated Modes: 5 Number of Modes Used in the Actual 3D Analysis: 1 Select modes: None |
Port2/Face |
Electric |
Port |
Reference Impedance: Select Specify Enter 50 [Ω] Number of Modes Number of Precalculated Modes: 5 Number of Modes Used in the Actual 3D Analysis: 1 Select modes: None |
Outer Boundary Condition |
Electric |
Electric Wall |
|
Self inductances and a mutual inductance can be calculated through the acquired impedances. They can be compared with the values acquired by magnetic analysis.
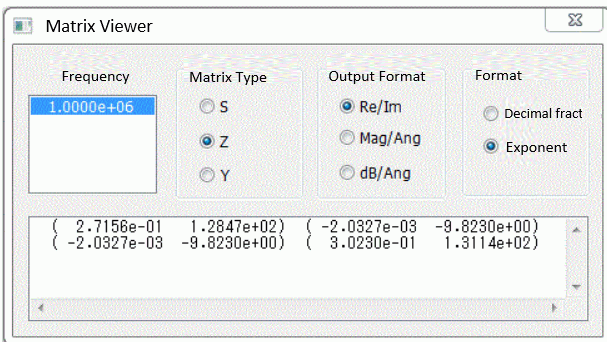
Fig.1 Z parameter
In the [Matrix Viewer] dialog box shown above, Re/Im is selected at Output Format.
The value is displayed in the format of (Real part, Imaginary part). The value of (2.7156e-01 1.2847e+02) means
Z11 = 0.27156 + 128.47j.
With this information, the self inductances and the mutual inductance are calculated as follows.
Note that angular frequency ω is 6.28×10⁶ rad/s as the frequency is 1 MHZ,
R1 + jωL1 = Z11 gives L1 = 20.45 [μH] ,
R2 + jωL2 = Z22 gives L2 = 20.87 [μH], and
R3 + jωM = Z12 gives M = 1.56 [μH].
The self inductances and the mutual inductances given by the analysis are as follows.
(Obtain the project file for the magnetic analysis) (Save the project file before open)
Results will vary depending on Femtet version and the PC environment.
To show the [Matrix Viewer] dialog box, go to the [Results] tab and click [Show Characteristics Chart] ![]() , and then select [SYZ Matrix] on the submenu.
, and then select [SYZ Matrix] on the submenu.
In the [SYZ Matrix] dialog box, select [Matrix Viewer] from the [View] menu.
The transferred power Pout [W] when the power Pin [W] is applied at the primary Coil1
is obtained by the following two methods.
The transferred power Pout is calculated with the input power Pin and S-parameters S21 as follows.
Pout = Pin ×|S21|2
In this example, on the [Harmonic Analysis] tab, Pin is set to 1.0 W.
S-parameters are calculated as in Fig. 2 below.
|S21|2 = (-0.0344)2 + 0.03752 = 0.00259
Then Pout is 2.59 mW.
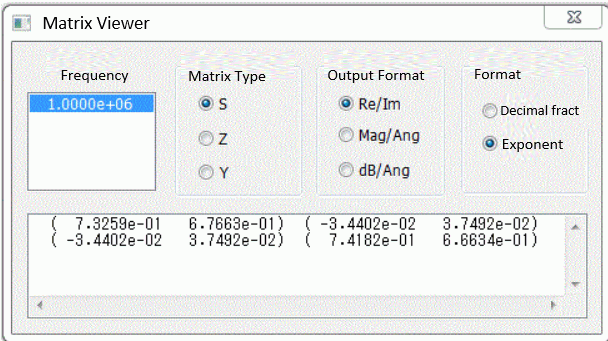
Fig. 2 S-parameters
Transferred power Pout is calculated with the amplitude of the voltage of V2 [V] across the port of the Coil2 and
the reference impedance of Z[Ω] of the port as shown below.
Pout = |V2|2/(2Z)
As the X component of the electric field is parallel with the integral path of Port 2,
select [X component] for the component and [Absolute] for the phase and integrate on the integral path, yielding the amplitude of the voltage V across the port (Fig. 3).
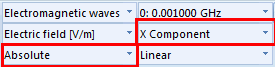
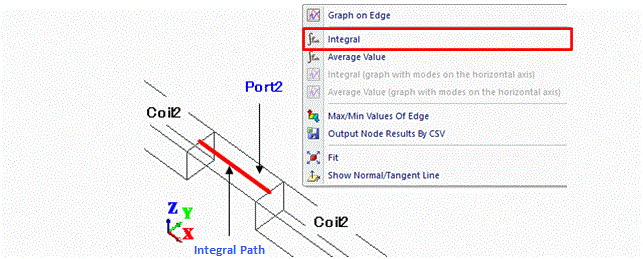
Fig. 3 How to Solve the Voltage across the Port
In this example, the output window below will show up after the integral command execution.
The amplitude of voltage is 0.509 V.
Output Window |
------------------------------------------------------------ Integration Target: Edge 227 (0) Solver: Electromagnetic analysis Mode : 0: 0.001000 GHz Field: Electric field [V/m] Component: X Phase: Absolute ------------------------------------------------------------ Integration result [V]: 5.088374e-001 Length (m) : 1.000000e-002 ------------------------------------------------------------ |
The reference impedance is 50 Ω which is the reference impedance of Port2.
The transferred power is calculated to be 2.59 mW.
If the frequency increases, the current tends to concentrate on the surface of the coil and current density distribution will be generated across its cross section.
Therefore, an accurate value of current cannot be given by the calculation where the current density at a point on the cross section is multiplied by the cross sectional area.
The current in the coil is calculated with Ohm's law I=V/R ( I: Current [A], V: Voltage [V], R: Resistance [Ω])
and the voltage to be applied to the resistor on the coil.
As an example, the current I1 in the Coil1 is calculated here.
First, place the resistor on Coil1.
As shown in Fig. 4, remove a part of Coil1 and replace it with a sheet body connected to Coil1.
Set a lumped-constant boundary condition on the sheet body. Resistance is 1 Ω.
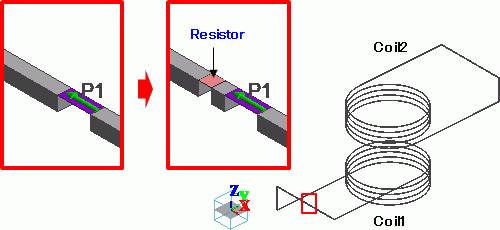
Fig. 4 Remove a part of coil and replace it with a resistor sheet body
Boundary Condition Name/Topology |
Tab |
Boundary Condition Type |
Settings |
Resistor/Face |
Electric |
Lumped Constant |
Resistance: 1.0×100 [Ohm] |
Execute the integral command on the electric field to calculate the voltage applied to the resistor.
In this example, the resistor is placed where the electric field vector is in the X direction.
Therefore, select [X component] for the component, and [Absolute] for the phase to calculate the amplitude of the voltage across the resistor.
As in Fig. 5, select an edge of the resistor sheet body parallel to the electric field and execute the integral command.
Then the output window will appear displaying the voltage across the resistor as integration results.
In Ohm's law, I = V/R. As R is now 1 [Ω], the value of voltage represents the value of current.
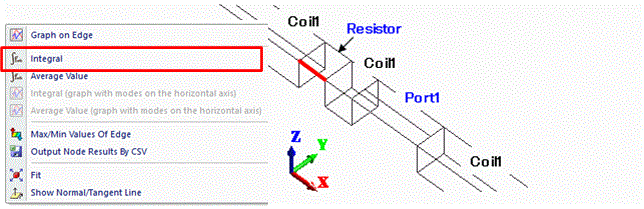
Fig. 5 Calculation of Current in the Coil
For easy understanding, the type of Port1 is changed from a power port to a current port.
The current in Coil1 is calculated with the resistor of 1 Ω on the coil.
The output window below will show up after the integral command execution as follows.
As the voltage value is equivalent to the current value, the amplitude of the running current is 1 A.
The current with an amplitude of 1 A flows in the current port.
See [Port of Electromagnetic Analysis] for more details.
Output Window |
------------------------------------------------------------ |
Type of Port1 is switched back to the power port and perform the analysis.
The output window below will show up after the integral command execution as follows.
If the power with amplitude of 1 W is applied to Coil1, the current with amplitude of 0.145 A will flow.
Output Window |
------------------------------------------------------------ |
Setting Coil1 as the primary coil, the electromotive force of the secondary Coil2 is calculated.
To make the ends of Coil2 open, remove the sheet body Port2.
In order to execute the integral command after the analysis,
place an air body between the ends of Coil2 as in the Fig. 6.
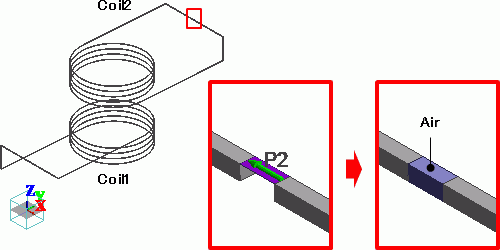
Fig. 6 Remove port and place air body
Perform analysis and calculate the electromotive force of Coil2.
In this example, the electric field vector between the ends of Coil2 is in the X direction, from one end toward the other end of Coil2.
Therefore, select [X component] for the component, and [Absolute] for the phase to calculate the amplitude of the electromotive force.
As in Fig. 7, select an edge of the air body parallel to the electric field and execute the integral command.
Then the output window will appear showing the electromotive force as integration results.
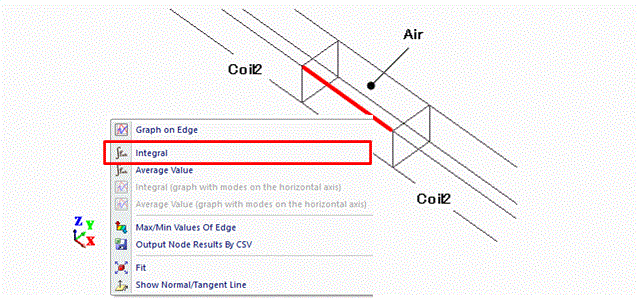
Fig. 7 Calculation of Electromotive Force
In this example, the results are shown on the output window as follows.
The electromotive force is 1.40 V.
Output Window |
------------------------------------------------------------ |
The electromotive Ve.m. of the secondary coil is expressed as follows.
Ve.m. = jωM I1
The angular frequency ω is 6.28×10⁶ rad/s, and the mutual inductance M is 1.47 μH as per Result 1 in this example.
The amplitude of the current I1 in Coil1 as per Result 3 in this example is 0.145 A.
The amplitude |Ve.m.| of the electromotive force of the secondary coil is 1.34 V.
This almost matches with the integration results on the output window.