Home / Examples / Electromagnetic Analysis [Hertz] / Example 34: Electrically Isolated Ground Electrode
A model having electrically isolated ground electrode is solved.
Unless specified in the list below, the default conditions will be applied.
Results will vary depending on Femtet version and the PC environment.
Item |
Settings |
Analysis Space |
3D |
Model Unit |
mm |
Item |
Settings |
Solver |
Electromagnetic Analysis [Hertz] |
Analysis Type |
Harmonic Analysis |
Hertz Option |
Select Apply propagation mode transformation. |
Mesh and harmonic analysis are set as follows.
Tab |
Setting Item |
Settings |
Mesh |
Element Type |
2nd-order Element |
Multigrid/Adaptive Mesh Method |
Select [Apply adaptive meshing]. |
|
Frequency-Dependent Meshing |
Reference Frequency: 8×10⁹ [Hz] Select [The conductor bodies thicker than the skin depth constitute the boundary condition]. |
|
Harmonic Analysis |
Frequency |
Sweep Type Linear Step by Division Number
|
Frequency Setup |
Select Discrete Sweep * |
*Discrete sweep or interpolation sweep is required to set ground on the port.
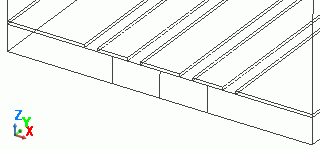
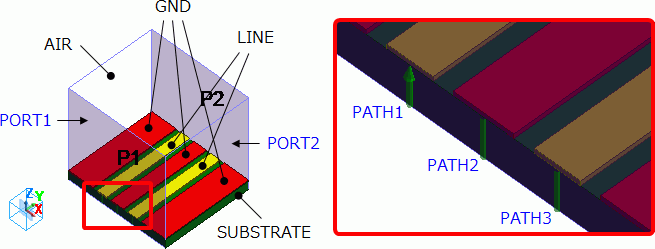
Alumina substrate placed in the air is created.
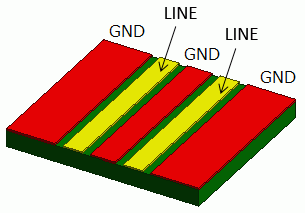
Two signal lines and ground electrodes are placed on the substrate.
As shown in the diagram below, ports are set on two planes. Electric wall of outer boundary condition is set on the other four planes.
Ground conductors on the right and left of the substrate are connected through the electric wall.
Ground conductor in the center of the substrate is not connected with the electric wall nor other ground electrodes. It is electrically isolated.
Body Number/Type |
Body Attribute Name |
Material Name |
0/Solid |
SUBSTRATE |
001_Alumina |
1/Solid |
GND |
003_Ag * |
2/Solid |
LINE |
003_Ag * |
3/Solid |
GND |
003_Ag * |
4/Solid |
LINE |
003_Ag * |
5/Solid |
GND |
003_Ag * |
6/Solid |
AIR |
000_Air(*) |
7/Solid |
<Imprinting body> |
|
8/Solid |
<Imprinting body> |
|
(*) Available from the material DB
Boundary Condition Name/Topology |
Tab |
Boundary Condition Type |
Settings |
PORT1/Face |
Electric |
Port |
Integral Path:
Reference Impedance:
|
PORT2/Face |
Electric |
Port |
Same as Above. |
Outer Boundary Condition |
Electric |
Electric Wall |
|
*1) To set the ground, select PATH2 and click [Ground] button. If PATH2[GND] is shown, the setting is successful.
*2) [Ground] button can be used only when Apply propagation mode transformation and Discrete Sweep are selected.
Go to the [Results] tab and select Port in [Solver]. From [Mode], select 8.2GHz which is the maximum analysis frequency.
As the Number of Modes to Precalculate is set to 5,
five propagation modes are calculated for each frequency.
The diagram below shows the electric fields of five propagation modes calculated for PORT1 at 8.2 GHz.
A part of the Propagation Constant dialog box is also shown at the bottom of each picture in the diagram below.
Propagation Constant dialog box can be opened from Mode Information of the [Show Characteristics Chart] button.
Mode |
Propagation Mode |
50: 8.200000e+09 Hz:( 0) |
PORT1 p1m1 |
51: 8.200000e+09Hz:( 1) |
PORT1 p1m2 |
52: 8.200000e+09Hz:( 2) |
PORT1 GND |
53: 8.200000e+09Hz:( 3) |
PORT1 Not used |
54: 8.200000e+09Hz:( 4) |
PORT1 Not used |
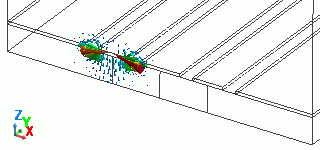
For PORT1, the first and second modes show electric supply to LINE.
For the third mode, [GND] is indicated in the Propagation Constant dialog box. No electric fields occur at the ground due to no power supply.
In the 3D analysis, the third, fourth, and fifth modes are not used. These modes are indicated with [GND] or [Not used].
Also at PORT2, please confirm that only the modes for electric supply are used in the 3D analysis.
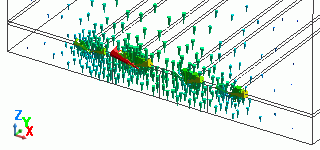
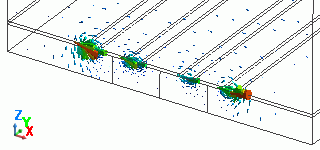
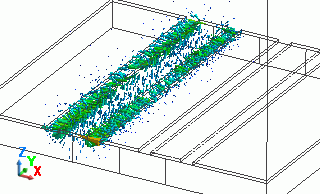
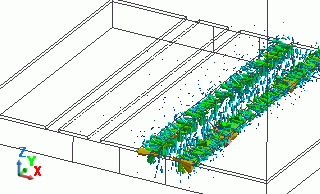
Electromagnetic fields below occur when electricity is supplied to each LINE from POR1.
Go to the [Results] tab and select Electromagnetic Analysis in [Solver], go to the Graphics Setting and click ▼,
and select [Field Superposition Setting] button. The Field Superposition Setting dialog box will appear.
By setting field superpositions below,
electromagnetic fields below are displayed when electricity is individually supplied to each LINE from POR1.
Field Superposition Setting |
Electric Field (7.2 GHz) |
|||||||||||||||
|
|
|||||||||||||||
|
|
In the example above, MAG is set to 1. It means the electromagnetic fields are created with the input power of 1 W.
See the Field Superposition Setting for further information.
Click [SYZ Matrix] of the [Show Characteristics Chart] button. SYZ Matrix dialog box will show up.
Select your desired component and click [XY Graph] button. An S-parameters graph will appear as follows.
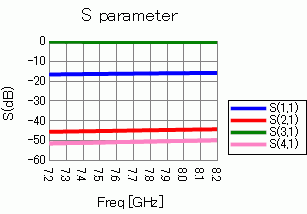
As shown in the Port Index on the SYZ Matrix dialog box,
suffixes of S-parameters indicate the ports as follows.
Number |
Port: Mode |
1 |
PORT1: PATH1 |
2 |
PORT1: PATH3 |
3 |
PORT2: PATH1 |
4 |
PORT2: PATH3 |