Femtet Help/Manual
 

Home / User Interface / Trees / Project Tree
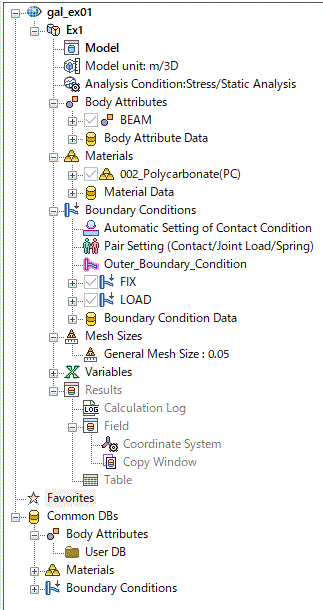
Project Tree

The various information for the project currently open is displayed on project tree.

The analysis models, conditions, attributes, results and favorites are on the tree.

Body attributes, material properties and boundary conditions, which are registered on User DB, and material DB can be viewed in Common DBs.


Tree Legend

Bold characters (active)

Currently active analysis model and project are indicated in bold characters.

The commands on the ribbon menu are executable.

Double click the item on the tree to switch.

* mark

Indicates that the item is being edited currently.

<incomplete>

Indicates that the information required for the simulation is not fully entered.
Double click the item and complete the data entry in the launched dialog box.

<undefined>

Indicates that the attribute data doesn't exist.
To create it, double click the item, enter the attribute data in the launched dialog box, and click OK.

Databases

Body attribute data /Material property data/Boundary condition data

Each analysis model has its own data of these.

They can are used only by their owner model.

They can be shared through User DB. Right click the mouse and click [Transfer to User DB].

Material Database

Common DB contains the data for various standard materials.
See [How to Set Body Attribute/Material Property] for more details.


  • Incomplete data may exist.

  • Values are not editable in this DB.

User DB

Some data which are used often can be stored in Use DB

Once stored in User DB, they can be shared with other projects and analysis models.

Specify their folders at [General Settings] - [Database].

To use the data in the database,

select [Use in Active Analysis Model] on the right-click menu.


  • How to share a file among users
    ”UserV2.***” is created in a folder specified at Database of [General Settings]. (Note that "User.***” is a file created by Femtet version 2020.0 or earlier )
    The file is shared by copying it to individual computers.

  • The database created by Femtet version 2021.0 or later cannot be used in the earlier versions.


Possible Operations in Project Tree

Categories

Possible operations

Operations on projects

  • Insert a new analysis model
    Right click on the project name and click [Insert New Analysis Model].
     

  • Close the project
    Right click on the project name and click [Close].
    All the models and results in the project are closed as well.
     

  • Save the project
    Right click on the project name and click [Save].
    All the models and results in the project are saved as well.
     

  • Return to the previously saved state
    Right click the project name and click [Return to Previously Saved State].
    All the models and results in the project return to the previously saved state.

  • Run mesher and solver
    Right click on the project name and click [Run Mesher/Solver for Selected Projects] or [Run Mesher/Solver for All Projects].
    Batch simulations will be executed for all the analysis models.
    See [How to Use the Batch Execution Tool].
     

Operations on analysis models

  • Copy the analysis model
    Right click on the analysis model name and click [Copy into Project].
    To copy it into other project, click [Copy] first. Then, right click on the other project name and click [Paste].
     

  • Delete the analysis model
    Right click on the analysis model name and click [Delete].
    The results will be deleted as well. It is not possible to undo the operation.

  • Rename the analysis model
    Select the analysis model name, and click it again or press the <F2> key to get into the edit mode.

  • Run the mesher and the solver
    Right click on the analysis model name and click [Run Mesher/Solver].

  • Create the 2D model
    Right click the analysis model name and click [Create 2D Model].
    You can create a 2D or axisymmetric analysis model from the selected one.
    See [How to Create 2D/Axisymmetric Analysis Model from 3D Model].

Operations on models

  • Show the modeling window
    Double click 'Model', or right click on it and click [Show Modeling Window].
    The main window will turn to the modeling window.

  • Copy the model
    Right click on 'Model' and click [Copy].
    Then right click on the name of destination analysis model and click
    [Paste].

Operations on analysis conditions

  • Check or edit the model unit / analysis space
    Double click the 'Model unit/Analysis space', or right click on it and click [Edit Analysis Space].
    The dialog box for Analysis Space Setting will appear.

  • Check or edit the analysis conditions
    Double lick the 'Analysis Condition', or right click on it and click [Edit Analysis Conditions].
    The dialog box for Analysis Condition Setting will appear.

  • Copy the analysis conditions
    Right click on the 'Analysis Condition' and click [Copy].
    Then right click on the name of destination analysis model and click [Paste].

Operations on attributes (body attributes, material properties and boundary conditions)

  • Edit attributes
    Double click on the attribute name or press the <Enter> key on it. The dialog box will appear.

  • Rename attributes
    Select the attribute name, and press the <F2> key or click the name again to get into the edit mode.
    All the names of bodies and topologies bearing that attribute name will change as well.

  • Delete attributes
    Select the attribute name and press the <Delete> key. The associated body attributes and material properties will be deleted.

  • Transfer the attributes to User DB
    Right click the attribute name and click [Transfer Attributes to User DB].
    The attribute data will be registered into the Common DB folder on the project tree.
    If that attribute name already exists in the Common DB, you will be asked whether you want to overwrite it.


Operations on bodies

  • Delete attributes
    Select the body and press the <Delete> key. The associated body attributes will be deleted. (The body will not be deleted.)

Operations on mesh sizes

  • Edit the general mesh size
    To set the general mesh size, single-click the general mesh size on the tree. Alternatively, execute [Edit] on the right-click menu.
    One tenth of the maximum dimension of the model will be the general mesh size,
    1) if you leave it blank or enter a negative value, or 2) if you select [Automatic Calculation] on the right-click menu.

    If you select 'General Mesh Size' and press the <Delete> key, it will become 'Automatic Calculation'.

  • Edit the individual mesh sizes
    Click on the size figure and press the <F2> key or click it again. You will get into the edit mode.


Operations on variables

See [Variables].

Operations on results

  • Show the results window
    Double click an item on 'Results' or right click on it and click [Show Results Window].
    The main window will turn to the results window.

  • Register and apply the results display setting
    See [Registering Results Display Setting].
     

  • Duplicate Window
    Double-click on the window (or execute [Duplicate Result Window] on the right-click menu.
    Duplicated window will be displayed.
    The results will be shown on the multiple windows.

Operations on various attributes data

and Common DB

  • Change values
    Double click the data, or press the <Enter> key. The dialog box will appear.

    • You can change the values only when the project is open.
       

  • Copy data
    Select the data, and click [Copy] on the right-click menu or press <Ctrl>+<C> keys.
    Move to the destination folder and click [Paste] on the right-click menu or press <Ctrl>+<V> keys.
     

  • Delete data
    Select the data, and click [Delete] on the right-click menu or press the <Del> key.
     

  • Change labels
    Select the data and press the <F2> key.
    There will be no change on the attributes of bodies and topologies even if the data names are changed.
     

  • Create new data
    Select the label of the folder and click
    [New] on the right-click menu. The new data will be created in the folder.
     The dialog box will appear to enter the values. If you click Cancel, no new data will be created.
     

  • Use the data in the current analysis model
    Select the data in the User DB or the Sample DB, and click [Use in Current Analysis Model].
    The selected data will be registered in the current analysis model for use.
    If the data already exists in the current analysis model, you will be asked whether you want to overwrite it.


  • Transfer the data to the User DB
    Select the data on the tree or in Sample DB, and click [Transfer to User DB] on the right-click menu.
    If the data already exists in the User DB, you will be asked whether you want to overwrite it.